4. Into Darkness
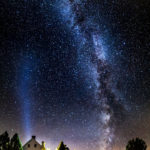
Due Thursday by 3:15 pm Points 100 Submitting a file upload File Types jpg New moon is Oct. 1st. That means you have a unique opportunity for a few days on either side of that date to photograph dark skies and stars. In the spirit of pre-visualizing, planning, and executing your photographs, your assignment is:
1. Find a landmark you’d like to photograph with stars and/or star trails behind it.
2. Download Stellarium from www.stellarium.org and use it to determine when you could photograph the milky way in the same composition as your chosen landmark.
3. Take your photographs (you’ll want to determine how to focus your lens to infinity in advance, so you don’t have to figure that out in the dark).
Your final deliverable will be two .jpg images. One should be exposed such that the stars are points in your photograph, as opposed to streaks. The second should be either a very long exposure to create star trails (probably at least a one hour exposure), or a series of star photos stacked to create star trails (this is usually the more pleasing approach. Again, you’d probably want the series exposed at regular intervals over the course of at least an hour).
Please be safe and don’t go anywhere dangerous or alone. Don’t trespass and don’t fail to bring adequate supplies for your comfort and safety (you’ll probably need a coat. . . what am I, your mother?).
Hint: You’ll probably need a remote shutter release for this assignment. These are available from online retailers such as Amazon for a few dollars.
Hint 2: You can check the clear night skies forecast here: http://www.cleardarksky.com/csk/
Hint 3: Here is a list of common “correct” exposure settings for common apertures while taking night sky shots:
f/1.4, ISO800 = 30s
f/2.8, ISO3200 = 30s
f/4.0, ISO6400 = 30s
f/5.6, ISO12800 = 30s
Hint 4: Here are four tutorials that can help you:
http://petapixel.com/2013/03/18/how-to-photograph-star-trails-from-start-to-finish/
http://petapixel.com/2013/04/25/a-complete-guide-to-star-trailing/
http://petapixel.com/2014/01/29/picking-great-lens-milky-way-photography/
https://www.youtube.com/watch?v=Rydg7JGTAbw
Hint 5: Make sure your batteries are fully charged.
This assignment is for Digital Photography course (ART 3040) at Dixie State University in St. George, Utah taught by Alex Chamberlain in the Fall of 2016.